Start innovating today! b.Boards & classroom kits now available!
Start innovating today! b.Boards & classroom kits now available!
Start innovating today! b.Boards & classroom kits now available!
Order NowStart innovating today! b.Boards & classroom kits now available!
Innovation in Action
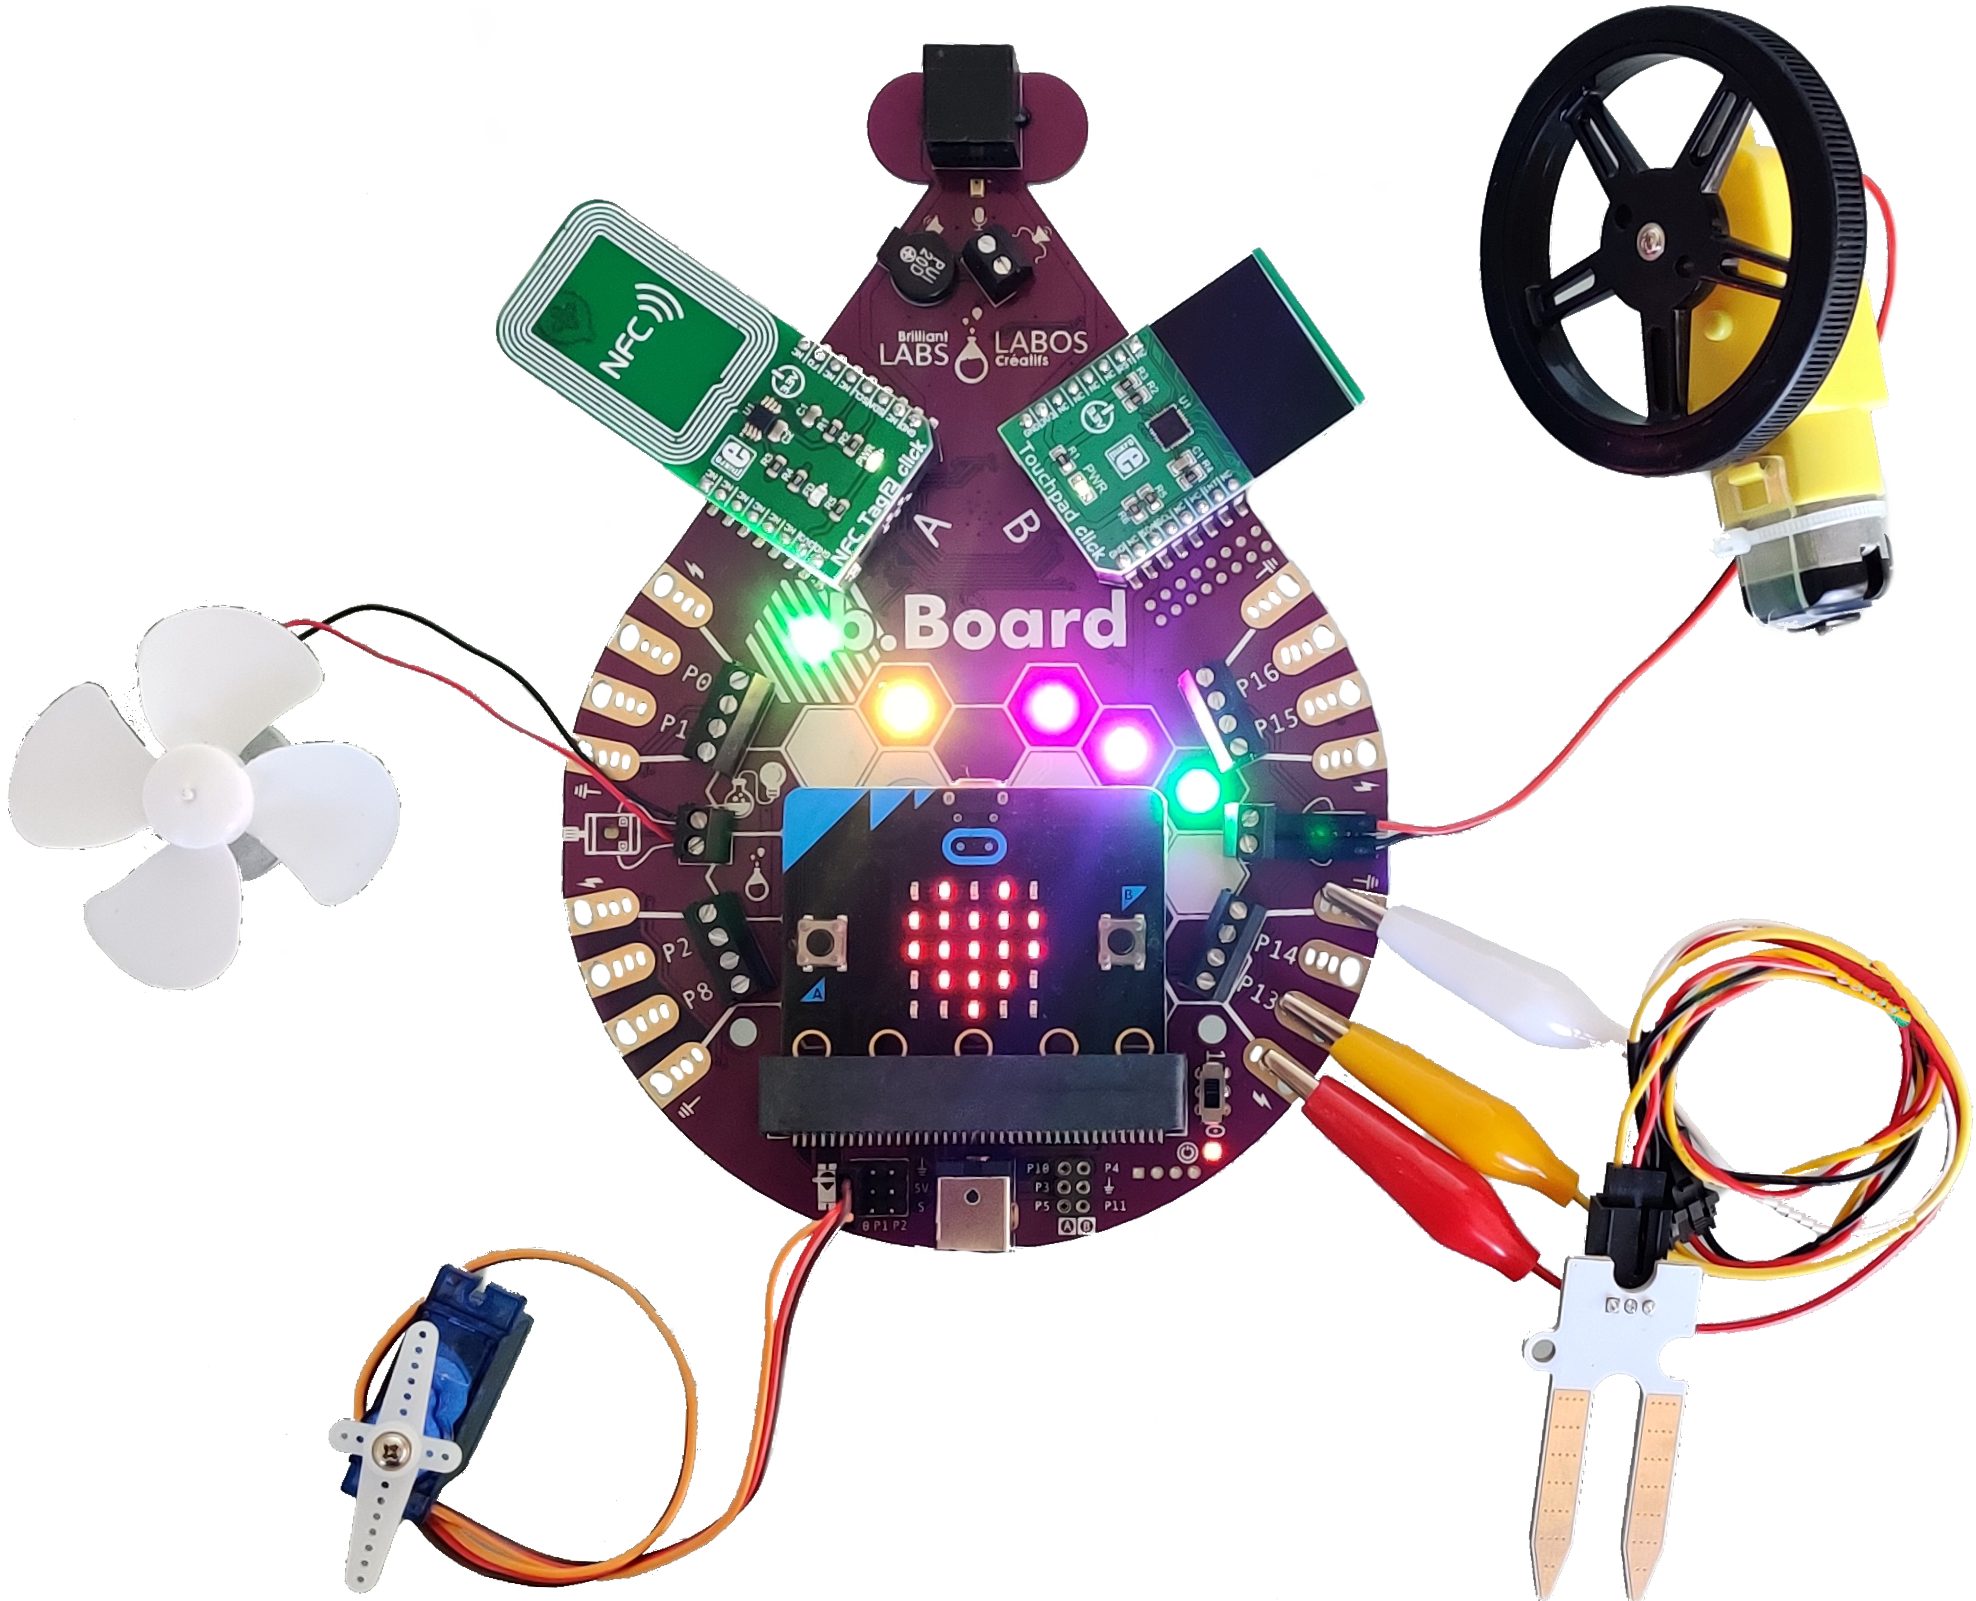
Learn how to get a b.Board, code it, discover its features and be inspired by student projects.
HOW TO b.BOARD >
BENEFIT & FEATURES >
The major benefit of the b.Board is allowing users to unlock the full potential of their creativity without any limitations. Acting like a superhero cape for the BBC micro:bit, the b.Board extends the capabilities of the tech, allowing for larger and more advanced projects. The b.Board has many features that allow innovators to achieve projects that otherwise may have been impossible with a micro:bit alone.
To ensure safe and effective use of the b.Board we encourage you to review the safety sheet before using your b.Board.
The b.Board is an Atlantic Canadian open source electronics hardware prototyping platform. Designed to be accessible to creators, researchers, and inventors of all ages. Using this fun interactive device, you can bring your IoT, robotics or other hardware project ideas from concept to reality! Say Hello to b.Board>
The b.Board welcomes you to your one-stop destination for everything you ever wanted when combined with a BBC micro:bit! The Brilliant Labs b.Board opens up a new world of design possibilities with its integrated breakout pins, high current supply capability, clickboard™ compatibility, expansion port and much more! b.Board At A Glance>
With the help of the Microsoft MakeCode Integrated Development Environment (IDE) at code.brilliantlabs.ca, students of all ages and innovators at any skill level are able to program their b.Board through any combination of blocks, Javascript and Python with even more languages on the horizon! Check it out>
- 2 x 1 amp per channel current limited motor drivers
- 5 x individually addressable RGB LEDs (BLiXels)
- 2 x Mikrobus Headers for ClickBoard use or additional I/O
- 3 x Onboard Servo Pins
- 1 x Onboard Microphone
- 1 x Onboard Speaker + 1 x Speaker Output
- Onboard ESP32 Wi-Fi for easy IoT and data collection
- 8 x Gator Grabber micro:bit pin breakouts
- Terminal Blocks for easy wire connection
- Battery or Wall Powered options
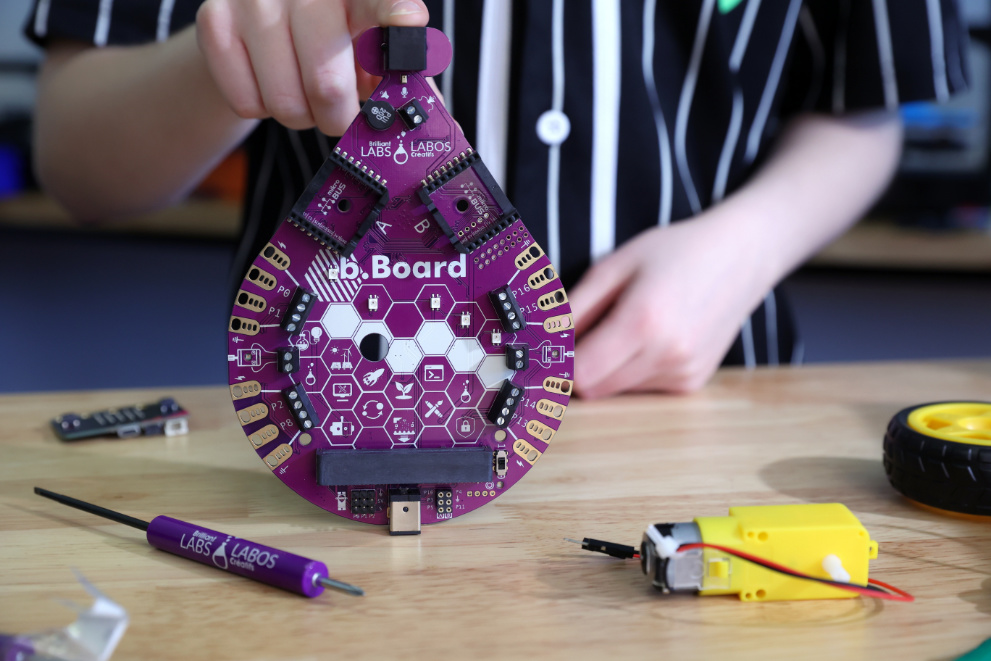
A CLOSER LOOK >
Hear your code. The b.Board has an impressively loud magnetic transducer/speaker (A) driven by a 1.5W Class D amplifier. If this is not loud enough, hook up your own speaker via the terminals (B) connected in parallel to the on-board speaker.
How loud is too loud? Code the b.Board to use the built in microphone and find out! The b.Board uses an analog Micro-electromechanical systems (MEMS) microphone with 90 V/V oto measure the levels of sound in its environment.
Expand the functionality of your b.Board with Click Boards from Mikroe. Your b.Board supports a growing number of peripherals including motion sensors, servo drivers, Carbon Dioxide monitors and much much more. In addition to being used for Click Boards, these 2×8 headers provide additional 12 bit ADC, PWM, digital I/O, SPI, I2C, UART capabilities and more.
This is the cozy home for your micro:bit. Make sure your micro:bit is fully seated so that none of the gold pins peek out of the black header.
Need your project to turn at a specific angle? These connectors will make adding servos to your project a breeze . Attach up to 3 servos to these pins to provide 5V, GND and signal to each. The signals of each of the servo pins are shared with P0, P1 and P2 Gator Grabbers so be careful not to use both the servo and the gator at the same time.
BLiXels are our name for the 5 individually addressable LEDs that are found on the front of your b.Board. These little lights can be changed to flash in any pattern and in any colour. These lights also look great when diffused using different translucent materials.
BLiX Processor
Did you know that the b.Board has a brain? Well, it’s not exactly a brain, but it’s a microcontroller, the Microchip dsPIC33CK256MP506, that processes all of the commands and instructions it receives. This processor has custom software on it that we call firmware that changes from time to time whenever we add new awesome features. Check out the firmware section for more information.
BLiX Protocol
When you program a block or line of code in the IDE to control a click board or one of the b.Board peripherals, the micro:bit sends commands over I2C to the BLiX processor using a protocol we call the Brilliant Labs information eXchange, or BLiX for short.
Do you have a microcontroller other than the micro:bit you’d like to use with the b.Board, or maybe even a different language you’d like to program in? Not a problem! Our BLiX protocol is well documented and can be found here. All you need to do to control the b.Board from your device is send the proper BLiX commands over I2C to it to harness it’s capabilities!
With on-board WiFi via a ESP32 chip, the b.Board can become an IoT device using as few as 4 blocks of code. When combined with our Brilliant Labs Cloud, the b.Board can publish, and subscribe to student driven data using MQTT. Have a favourite REST API you like to use? The b.Board can work with most any REST API out there with just a few extra blocks in your code!
The b.Board has two channels of 5V 1 Amp current-limited motor driver capabilities via a built-in bipolar motor driver IC. Control the speed and direction of two DC motors independent of each other or one stepper motor.
Grab some alligator clips and hook them up to these helpful Gator Grabbers . There are 4 groups of Gator Grabbers on the b.Board with access to power and ground on either side of data pins.
Power: 3.3V is available on any of the gators you see with this lightning bolt symbol on it. The 3.3V supply is current-limited to 2A, so you’re protected, but you should still try to avoid shorting out these pins to GND.
Px: P0, P1, P2, P8, xxxx can be found on gator grabbers around the perimeter of the b.Board in between power and ground. Each of these pins is connected internally to the micro:bit P0,P1,P2 etc for easy alligator clip connection.
Ground: Electricity always needs to find a path back to where it began. If your power is coming from the wall, that path back is through the ground, so we like to call this pin “ground”. Look for this ground symbol anywhere on the b.Board to help complete your circuit.

Sometimes even an alligator isn’t strong enough for your connection needs, but don’t worry we’ve got you covered. Use the wire terminals found above each gator grabber to clamp down on your wires for a guaranteed connection. The wire terminals are laid out in the same pattern as the gator grabbers with power and ground on the outside and the micro:bit pins in between.
- Use a small flathead screwdriver and rotate left/counterclockwise to open up the wire terminal
- Insert your wire
- Rotate right/clockwise to have the terminal clamp down on your wire.
Power Switch
0 = OFF; 1 = ON. Always make sure that your power switch is on before you test your code. The red coloured LED must be ON for your b.Board to work.
Extra pins
If you find yourself having used every micro:bit pin around the perimeter of the b.Board and need more, take a look at the the 6 pin breakout header below the micro:bit connector.
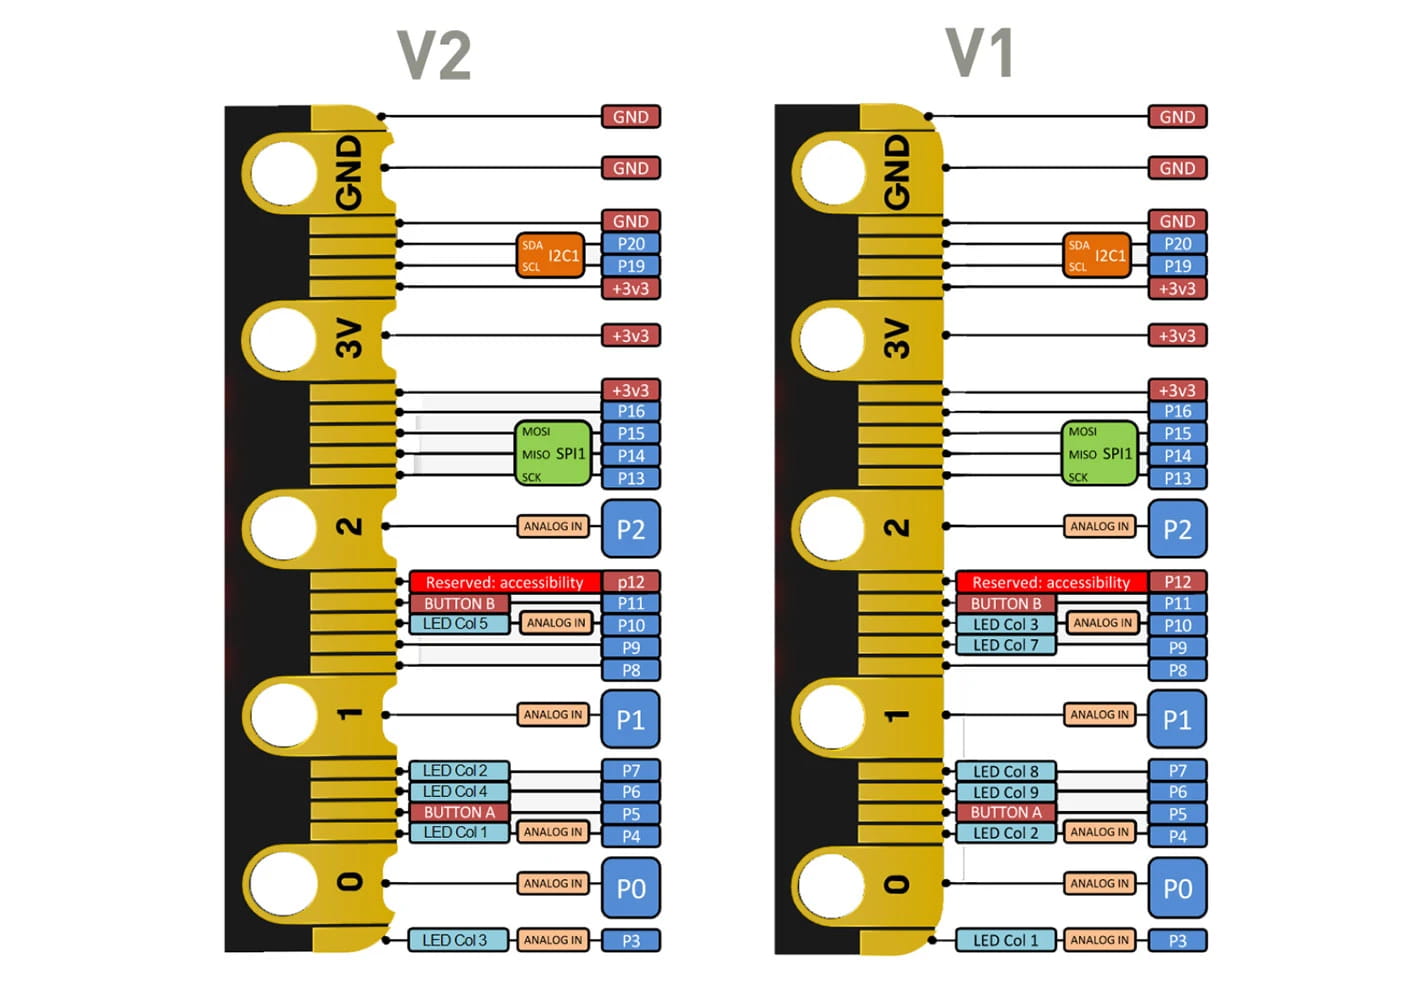
Take note though of the pin names listed and what features they are shared with according to the graphic below and if you have a version 1 or version 2 micro:bit
Power Supply
The b.Board uses a standard 2.1mm diameter by 5.5mm long DC barrel connector with a positive centre for power. The best way to know if your power adapter or battery pack fits is to try it without batteries or plugged into the wall.
Now that you know it fits, make sure that your power supply is between 6VDC-12VDC and should supply at least 1A or more if you plan on powering motors or lots of LEDs etc. The b.Board protects against reverse polarity and overcurrent, so no need to worry about that.
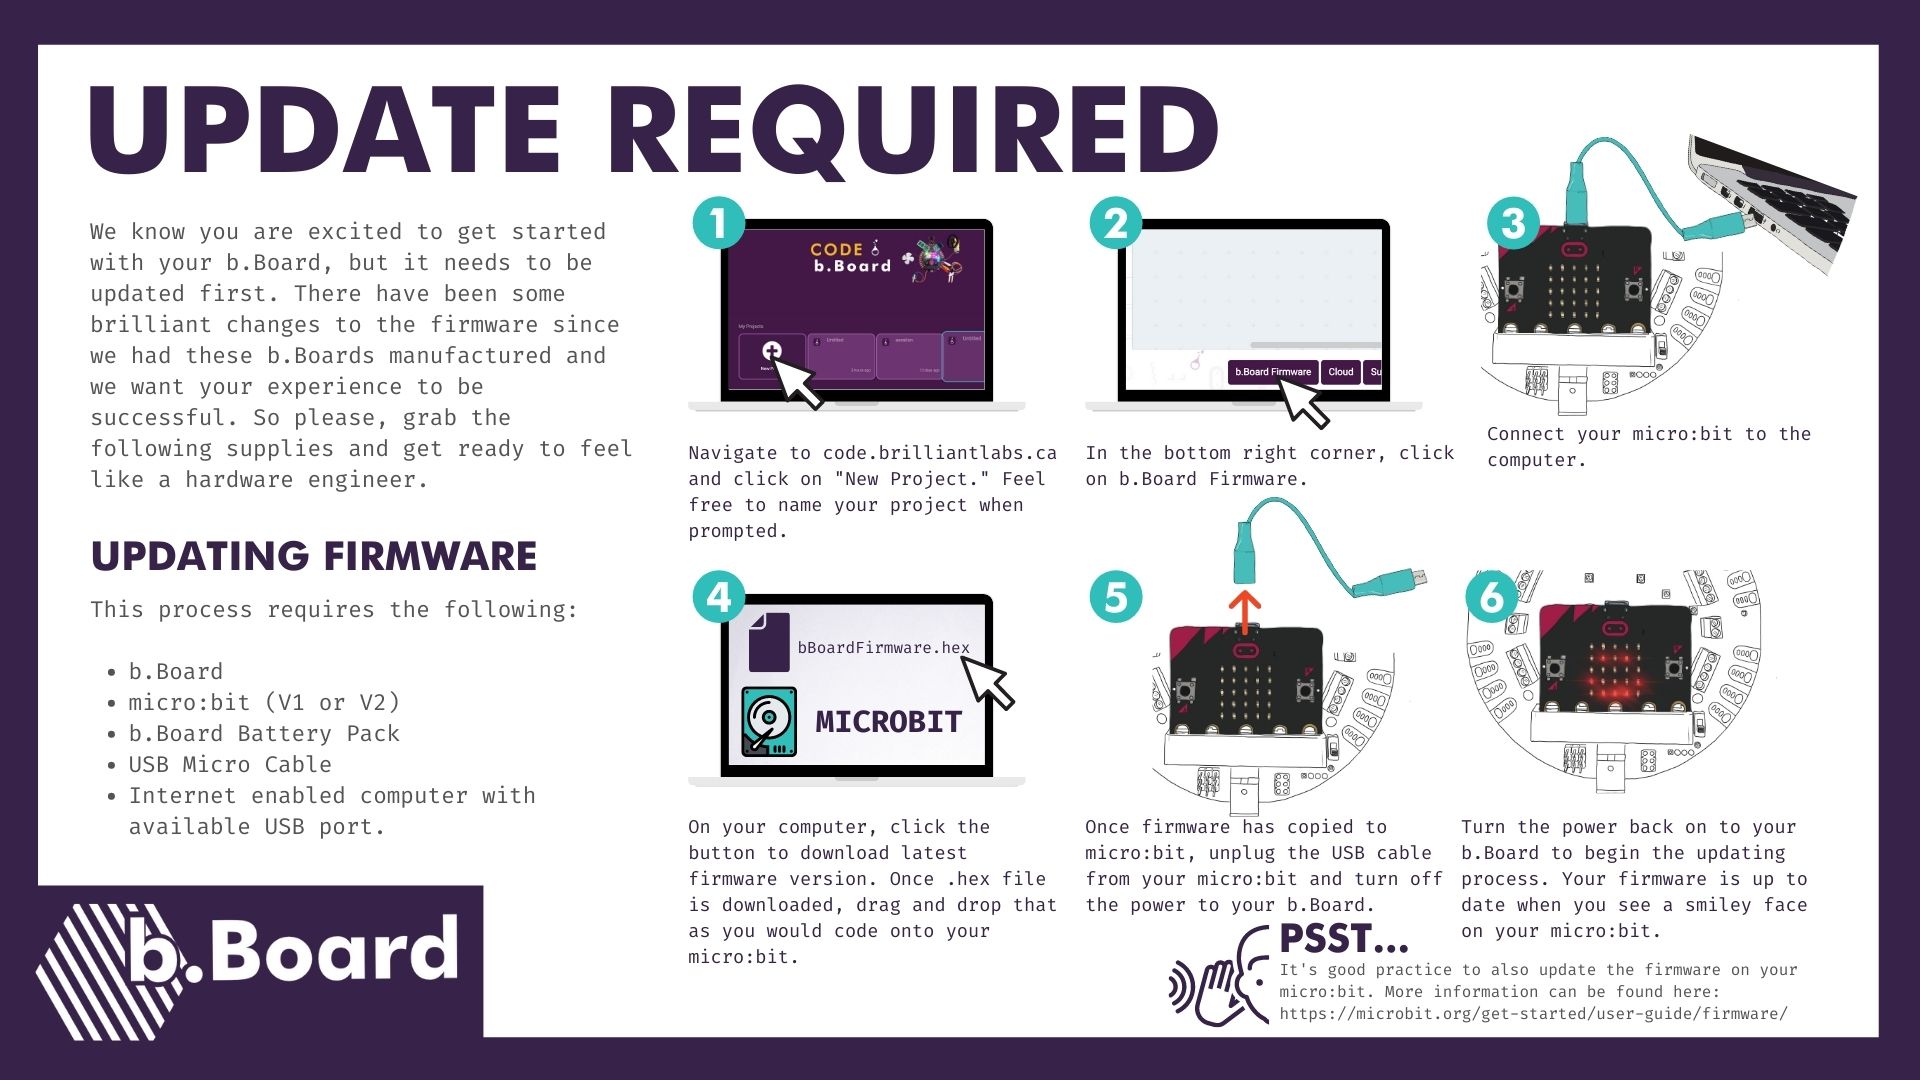
The b.Board has its own set of code and instructions we call firmware that let it control the BLiXels, motor driver, speaker, microphone, WiFi and MikroBUS expansion ports. We’re always looking to improve on these instructions and features and when we do, we need a way to get that new firmware to your b.Board. To do that, the b.Board has a built-in “firmware updater” called a “bootloader” that checks each time the b.Board is powered up or reset if the micro:bit is trying to send it new firmware. If you find some features on the IDE aren’t working for you, a good place to start your debugging is to first update the firmware:
- Make sure your micro:bit is seated in the b.Board and connected to your computer
- Turn your b.Board on
- Download the latest firmware file from the bottom of the IDE OR here
- Copy the hex file onto your micro:bit and press “A”
- Wait for the happy face and you’re done
GET SUPPORT & FIRMWARE >
NEW
LEARN HOW THE NEW b.BOARD CAN HELP YOUR STUDENTS MAKE PROJECT WORK EASIER, PROTOTYPE OR INSPIRE NEW IDEAS.
The b.Board is growing in popularity and is currenlty sold out. Don’t miss the next batch. Pre-order today!
Pre-order